The short answer: I’d use a Google review widget first. It’s the simplest path for most sites, it can auto-sync new reviews, and it works on WordPress, Squarespace, Wix, Shopify, Webflow, and custom HTML sites.
Here’s the whole article in plain English:
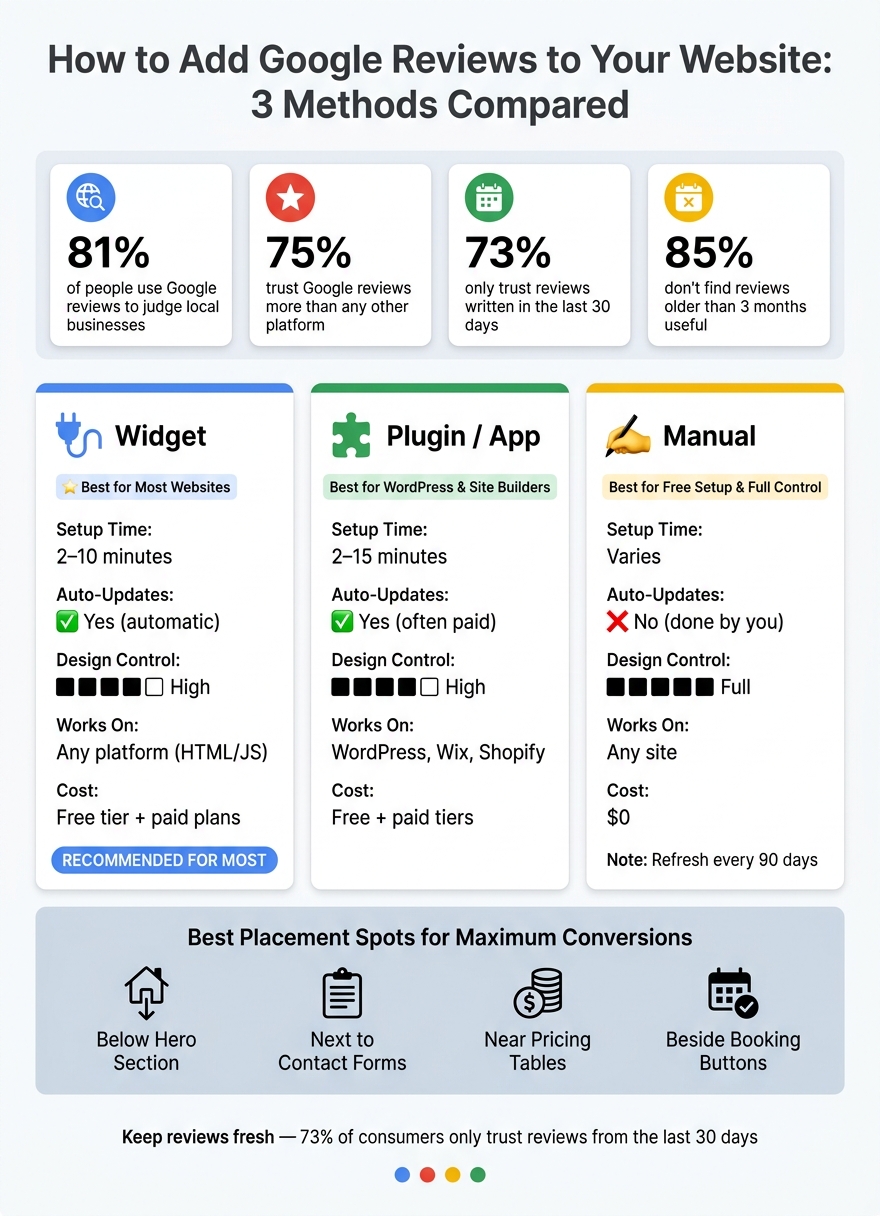
If I want the simplest setup, I’d start with a widget. If I want to stay inside my platform, I’d use a plugin or app. If I want full control and a $0 setup, I’d add review quotes or screenshots by hand.
| Option | Best for | Setup | Updates |
|---|---|---|---|
| Widget | Most websites | Easy | Automatic |
| Plugin / App | WordPress, Wix, builder users | Easy | Automatic |
| Manual | Free setup, full control | Easy | Done by me |
That’s the full playbook: pick the tool that fits your site, show reviews where people decide, and keep them recent.
Google Reviews on Your Website: Widget vs. Plugin vs. Manual
A Google review widget is a one-time embed that pulls reviews from your Google Business Profile on its own. Each review can show the reviewer's name, star rating, date, and review text. New reviews sync on a set schedule.
73% of consumers only trust reviews written in the last 30 days [2][10], so an auto-syncing widget helps keep your social proof up to date.
The simplest route is usually a third-party widget that works with your site editor.
A few tools make this pretty simple, with no coding needed. Elfsight has a free tier and paid plans, works across most platforms, and comes with a big template library [2]. Trustindex is a good fit for WordPress users who want an easy setup [9][5]. EmbedSocial and Tagembed work well if you want to pull reviews from places beyond Google [2].
Pick a tool, connect your Google Business Profile, paste in the embed code, and publish.
The setup looks almost the same across most tools:
Once the widget is live, put it where visitors are most likely to decide if they want to contact you.
On your homepage, the best spot is right below the hero section, where visitors can see proof of your reputation right away [2][10]. On service pages, place a slider or one standout review next to your contact form or "Get a Quote" button [2][10][7]. That puts social proof in front of people at the exact moment they're deciding whether to reach out.
A footer badge can work as a trust signal across the whole site [8][10]. If you run a service-based business like a contractor, landscaper, or cleaning company, a dedicated Reviews page with a grid layout can help show volume and build authority [4][8][10].
If your site runs on WordPress or a website builder, the next option may be even simpler.
If your site already runs on WordPress or a hosted builder, a native plugin or app is often faster than using a separate widget. It keeps everything inside the platform you already use, so you don’t have to deal with extra embed code.
Rich Showcase for Google Reviews and Widgets for Google Business Reviews are common WordPress picks for auto-updating Google reviews. You install the plugin, connect your profile, and drop the shortcode or block wherever you want the reviews to appear.
Free plans often sync less often. Paid plans usually update every 3 to 24 hours [5]. If your site is already on WordPress, this is usually the fastest path.
Some hosted builders make setup even easier.
In one.com's Website Builder, you can add the Google Reviews widget from the Social tab, connect your profile, and pick up to six reviews. The widget comes with one.com's Business + E-commerce add-on or its Pro and E-commerce plans [13].
If you use Wix, you can install the Google Reviews Slider & Feed from the Wix App Market. It syncs new reviews automatically, and setup usually takes about 5 to 10 minutes [5][12].
Squarespace works a bit differently. It doesn’t include a native Google Reviews block, so you still need to add a third-party widget inside a Code Block [5].
If your builder offers a native review app, start there before you add a separate widget. It’s usually the simpler option.
Here’s a quick side-by-side view to help you pick the simplest fit for your site.
| Feature | Third-Party Widget | WordPress Plugin | Website Builder App |
|---|---|---|---|
| Setup Time | 2–10 minutes | 3–15 minutes | 2–5 minutes |
| Auto-Sync | Yes, high frequency | Yes, often paid | Yes, automatic |
| Design Control | High (visual editors) | High (CSS/UI options) | Moderate (native tools) |
| Platform Support | Any site (HTML/JS) | WordPress only | Platform-specific |
| Maintenance | None (vendor-managed) | Low (plugin updates) | Low (platform-managed) |
| Best Fit | Multi-platform brands | Dedicated WordPress sites | Non-tech users on hosted builders |
Choose the option that fits your platform and the amount of design control you want.
Manual reviews make sense when you want full control or just need a simple backup without a widget or plugin. They work on any site. The catch is that you have to keep them up to date.
That tradeoff is pretty simple: more control, more upkeep. And that upkeep matters. Since 85% of consumers do not consider reviews older than three months to be relevant [1][2], a quick refresh every quarter helps keep things believable.
The fastest manual option is a button that sends people straight to your Google profile.
Go to Google Maps, search for your business, and click the Share button on your listing. Copy that URL and add it to a button on your site, such as "See Our Google Reviews" or "Read Reviews on Google." Put it near your contact form or pricing section, where people are already deciding if they trust you enough to take the next step.
If you want reviews to show up on the page instead of hiding behind a click, use screenshots or text quotes.
Screenshots let you show a review exactly as it appears on Google. Crop it tightly, compress the image, and add alt text like "Google review from Sarah M. - 5 stars" [3]. There’s one drawback: static screenshots can feel harder for some visitors to check, since there’s no live link back to Google [9].
Copied review quotes are a good fit when you want a simple text testimonial section. Copy the review text from Google, paste it onto your site, and pair it with the reviewer’s first name, a star rating (★★★★★), and a "Google Review" label. Always add a "Read full review on Google" link back to your profile so visitors can check the source for themselves [14]. Keep the wording exactly the same.
Manual reviews tend to work best near points where people pause and second-guess the decision. That usually means spots like:
Pick a review that answers the main concern a buyer is likely to have, then place it right where that concern shows up.
If you want the fastest fit for your site, compare this manual option with widgets and plugins next.
If you're still deciding, this quick guide makes the choice a lot easier.
| Your Setup | Choose This |
|---|---|
| WordPress site | A dedicated plugin like Trustindex, or a third-party widget pasted into a Custom HTML block |
| Wix or Shopify | Third-party widget in an embed or code block; Wix can also use a marketplace app |
| Squarespace or Webflow | Third-party widget in a Code Block or Embed element |
| Custom-built site | No-code widget snippet in an embed element |
| Free manual option | A manual section with selected review quotes or screenshots |
For most sites, a third-party widget is the fastest no-code route. It also keeps your reviews updated on its own.
Sometimes it's easier to bring in help instead of wrestling with setup on your own. That usually applies when your site setup or review flow has more moving parts.
Outside help can be a smart call for:
Before you jump in, keep these points in mind:
The best move is usually the simplest one: pick the option that fits your platform and puts real reviews where visitors are making their choice.
Yes. The simplest route is to use a third-party widget like Elfsight, SociableKIT, or EmbedSocial.
Here’s how it usually works:
That’s it. It’s a quick way to get your reviews onto a page without messing with custom code.
You can also go the manual route and add screenshots of individual reviews as images. Another basic option is to use Google Maps embed features for simple links.
No. You don’t need individual permission to show reviews that are posted publicly on your Google Business Profile, as long as you display them the right way.
Here’s the plain-English version: if a review is public on Google, you can show it on your site. But there are a few rules you need to follow.
To stay compliant:
An automated widget is usually the safest bet here. It helps pull reviews in as they appear, which cuts down the odds of mistakes, odd formatting, or accidental misrepresentation.
It can - especially if the widget is poorly built or not well optimized. A lightweight, well-built widget usually won’t hurt performance.
To help keep your site fast, look for one with asynchronous loading and lazy loading. It also helps to avoid heavy plugin-based options that inject multiple scripts on every page.
Discover strategies to elevate your business.